Tuesday, December 29, 2009

A few pics of the cabinets....

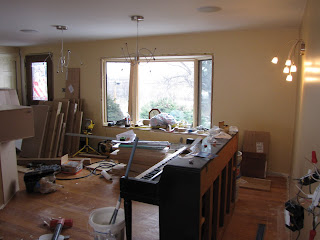
So, here a few pics of the kitchen with some of the cabinets installed. In the foreground of this picture are the tall, not very deep cabinets which be the "wall" under the island/bar sitting area. Behind in the distance are the few wall cabinets we have, one over the fridge, a big pantry next to the fridge and a corner cabinet. The fridge is moved into place.


In this picture below, this is the other section of the island/bar sitting area with more tall cabinets. The picture doesn't really do it justice, but we think it will have a bit of a wainscoting look/feel to it once the countertop is installed. To the left, background are the upper cabinets with frosted glass doors, they have lights installed in them, but I haven't connected the power to them yet. Then along the top, is the big space where the skylights are.


It just seemed like I don't take pictures of the skylight section lately, so here's one of that area.
Posted by Picasa

Thursday, December 24, 2009

Part 2

A couple more pics (cabinets in rough position) looking opposite direction.


Posted by Picasa

Merry Christmas....

So, stole a few hours this morning before needing to wrap things up for the big day tomorrow. Was able to get a fwe cabinets up, and most all the other ones roughly set in place. Enjoy!

Note the funky wall sconce below which will be above the piano.


Not sure why I took two pics of the same thing...


The cabinets in the foreground still need their legs, with the very plain doors we're using, it will sort of look like wainscoting under the bar area.


Whew, that big opening for the skylights is BRIGHT!
Posted by Picasa

Monday, December 21, 2009

A few photos

So I've been a bit harassed to post some more pictures. Unfortunately things are a mess, and I didn't think a photo would be too great. BUT, I've assembled the carcass of 17 cabinets. We've also painted the walls in the kitchen and dining area. And installed lights. BUT, it's really hard to tell from these photos!

MUCHO cabinets waiting for doors, drawers, etc. Finish paint color in background, two dining table lights installed. Bay window in background.


The bright opening of the three skylights, finish paint, refrigerator nook , lights more or less in.


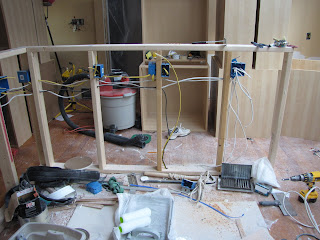
A few photos of the island electrical layout to remind me later.

Posted by Picasa

Monday, December 14, 2009

Walls and ceiling primed...

A ridiculous amount of time finishing off the sheetrock. Four coats in some areas, and of course overall it's not my forte, but I think it looks good enough to prime, so that's what's been completed. What a mess still -- I can't WAIT to get the floors cleaned up again. Ugh. Dusty and messy for soooo long.

Posted by Picasa

Taping finished!

So, the taping, finishing, sanding is complete or nearly so in the pictures below. Pretty happy with the way things have turned out so far. Ready for priming and painting, and I can assure you that all the Kerrs are ready for the dust and mess (or messiest) phase of the project to be completed.


Still haven't sheetrocked the island area, because there's a bit of uncertainty as to how high I need to make the walls. I think they're right, but I'm not 100% sure. I'll be sure during this coming week and will get that area finished off as well.


Posted by Picasa

Friday, December 11, 2009

Third (and final??) coat on

LONG day today grinding out more drywall finishing. Uh, my least favorite part of any remodeling job. Messy, slow, tedious, repeat. But the whole space is really looking pretty nice. I am still hoping to get at least a little primer up this weekend. We'll see.

Thursday, December 10, 2009

Second Coat

So, I just finished getting the second coat of compound on everything! Phew, what a long day....one of my arms will be as big as Popeye's before this is all said and done. Anyway, again, pictures would be fairly worthless. Suffice to say I'm on tap for my personal (ambitious) goal of priming/painting over the weekend! Yea!

Wednesday, December 9, 2009

Taping...

Well, the first coat of tape/mud is up on all the new sheetrock. What a lot of work this stage is, and sometimes the progress seems small, but so critically important. No new pics, because, in all honesty the changes are awfully small. I'm really hoping to be able to prime the walls and ceiling at some point over the weekend, so we'll see. So far, if all goes well, I'm on track. BUT, things don't often go well. And progress on this project is coming at the expense of most day to day things that I really need to take care of in order for the overall family life to go smoothly. So we'll see. Trust me, they'll be pics once I've primed everything.

Monday, December 7, 2009

Drywall!

And now, through the magic of lack of updating/surge of updating, the kitchen project has gone from rough wiring status to completely sheetrocked. Steve helped me both Saturday and Sunday (12/5-6) and we completed 95% of the sheetrock work then, I finished the last bit this morning and started taping, etc. Now, the glacial pace of taping/mudding.


Posted by Picasa

Electrical and sheetrock

Well, it's been a while since I've updated the blog, but I've been plugging away (tee hee hee) in the interim with electrical rough-in work and insulation/air sealing work. Took receipt of all the sheetrock and Paul helped me move it all inside. The pictures for today aren't too exciting, but the next ones should show everything sheetrocked!

Electrical rough-in, lots going on in the island, beam boxed in for sheetrock


Opened the entire area where the three skyslights are, much brighter and better.


Sheetrock waiting patiently by bay window.


First piece of sheetrock ready to hang!
Posted by Picasa

Monday, November 23, 2009

Siding and beam

Finally got the siding back up on the rear of the house. Still needs to be painted, but hopefully any day now we'll get to that before the snow sets in.


And here's a picture of the beam installed. Pretty cool. It really opens up the space. Installing it wasn't so bad either with the help of my cousin Steve.
Posted by Picasa

Wednesday, November 11, 2009

Bay Window

So it's been a while since I've updated the blog. You may think I was taking a break -- but NO. Well, I did take a break from the kitchen work for a little bit as I installed new casement windows in the kids' rooms (five in all). They look nice and we'll definitely enjoy being able to open the windows in the springtime. More importantly, perhaps, they're official egress size so in a pinch, the kids can now get out the windows onto the roof of the garage (perfect for when they need to sneak in as teenagers).

One item that had been on our list for the new kitchen/dining space was to replace a drafty, yucky picture window with a bay window. Well, my cousins Steven and Paul helped me the other day and we installed the bay window. SUPER HEAVY.

Once it was installed, I quickly realized that the roof overhang was not quite far enough to shield the bay window from the rain/snow, etc. There are various options, of course, for finishing the bay window, but I decided the best (though not fastest or easiest) was to extend all the roof rafter tails and effectively extend the roof/overhang so that it would protect the bay window. I got a great amount of work done today, but still need to do some more tomorrow to get it all finished off.

Interior bay window.


The original roof line -- not quite enough of an overhang for the bay window, partially prepped (torn apart) for extending the roof.


A bit of a close-up of the old roof line.


At the end of a very hard (and cold) day, the roof line has been extended, the space air sealed and insulated, and nearly ready to be buttoned up -- hopefully tomorrow.
Posted by Picasa

Wednesday, October 28, 2009

Exciting....

So, I had to leave one of the old walls of the kitchen in for a while, because first I needed to find a beam that would carry the load without being way too big (we don't have 8' ceilings in this house, so some of the beams I explored were going to simply be too big to be practical for this application). My cousin pointed out a product called "LiteSteelBeam" which I looked into. Long story short, this product would work. The actual beam I ended up getting is over-sized for the load requirements (it was what was in stock at the regional Boise Cascade distribution center), so it's really not light, but it's not too bad.

This shows the two temporary walls needed to carry the load before removing the load bearing wall. (LiteSteelBeam in place on floor to left.)


And now the wall is gone (in the picture below).


This is a photo/view that matches with one of the pre-construction photo vantage points.


This one...

The beam, waiting for hangers, and to be set.
Posted by Picasa

Not one, but THREE!

Well, it's been a bit since the last blog update, but work has continued to move forward. All three skylights are installed, roof re-shingled, and air sealing and insulation completed. We've had two serious days of rain since the skylights have been in, and so far so good (knocking on wood).


Posted by Picasa